Vulners proxy
Vulners Proxy is an open-source caching proxy designed to optimize and secure your infrastructure's interaction with the Vulners database. It routes requests from multiple Vulners agents or API uses through the Vulners Proxy, reducing duplicate queries and conserving credits. Additionally, it adds a layer of data obfuscation for enhanced security.
Key Features
- Efficiency: Reduces unnecessary API requests by caching responses.
- Security: Offers data obfuscation by encrypting real IP addresses of similar hosts.
Installation
Debian-based OS
-
Add Vulners Public Key:
wget -O- https://repo.vulners.com/pubkey.txt | apt-key add - -
Create Vulners List File:
echo "deb http://repo.vulners.com/debian focal main" | tee /etc/apt/sources.list.d/vulners.list -
Install Vulners Proxy:
apt-get update && apt-get install vulners-proxy
Source code
-
Prerequisites:
- Ensure Python 3 and pip are installed.
-
Clone and Set Up:
git clone https://github.com/vulnersCom/vulners-proxy.git cd vulners-proxy pip install -U -r requirements.txt -
Run the Server:
- Manually: uvicorn main:app --host 0.0.0.0 --port 8000
-
As a Service: Configure systemd to manage the service with a sample service file located at /etc/systemd/system/vulners-proxy.service
$ cat /etc/systemd/system/vulners-proxy.service
[Unit]
Description=Vulners proxy
After=network.target

[Service]
WorkingDirectory=/var/lib/vulners-proxy
User=nobody
PermissionsStartOnly=true
ExecStart=/usr/local/bin/uvicorn main:app --host 0.0.0.0 --port 8000

[Install]
WantedBy=multi-user.target
Proxy configuration
The configuration file at /etc/vulners_proxy/vulners_proxy.conf allows for customization of logging, server host and port, caching behavior, and encryption settings.
[logging]
LogFile = /var/log/vulners_proxy/vulners_proxy.log
LogLevel = ERROR

[app]
Workers = 1
Port = 8000
Host = 0.0.0.0
Reload = False
ApiCacheTimeout = 3600                  # seconds
CacheTimeout = 10800                    # seconds
CacheDir = /tmp/vulners-proxy.cache/
StatisticCacheDir = /tmp/vulners-proxy.statistic.cache/
Secret = secret_for_encrypt_ip_fqdn     # 32 symbols required length
EnableEncryption = 0                    # 0 - disabled, 1 - enabled
ApiRequestTimeout = 120

[vulners]
ApiKey = YOUR_SECRET
Logging settings, proxy server host and port, cache directory, and timeout can be adjusted.
Additionally, the proxy has the capability to encrypt the IPs and FQDN of your agents before forwarding them to Vulners. To enable this feature, set a secret key and change the EnableEncryption flag to 1.
API key
While encryption is enabled, readable agent identifiers will not be visible in the Linux scanner dashboard, only hashes. To generate readable reports, configure a custom dashboard on your side of the proxy. For instance, you can use Defect Dojo with the Vulners plugin.
Starting the Proxy
Enable and start the Vulners Proxy service with systemd commands:
systemctl daemon-reload
systemctl enable vulners-proxy
systemctl start vulners-proxy
Agent and API configuration
Redirect your Vulners agents and API requests to the proxy by specifying the proxy's address in their respective configuration files. Add the proxy host address at the end.
-
Agent Configuration Example: Update /etc/vulners/vulners_agent.conf with the proxy's address.
[DEFAULT] api_key = YOUR_SECRET vulners_host = http://<proxy_vm_ip_address_or_fqdn>:8000 -
API Configuration Example: Use the
server_urlparameter in your API client setup to point to the proxy.import vulners vulners_api = vulners.VulnersApi(api_key="YOUR_SECRET", server_url="http://<proxy_vm_ip_address_or_fqdn>:8000") # Plain text software + version example for Ngnix 1.4 sw_results = vulners_api.get_software_vulnerabilities("nginx", "1.4") sw_exploit_list = sw_results["exploit"]
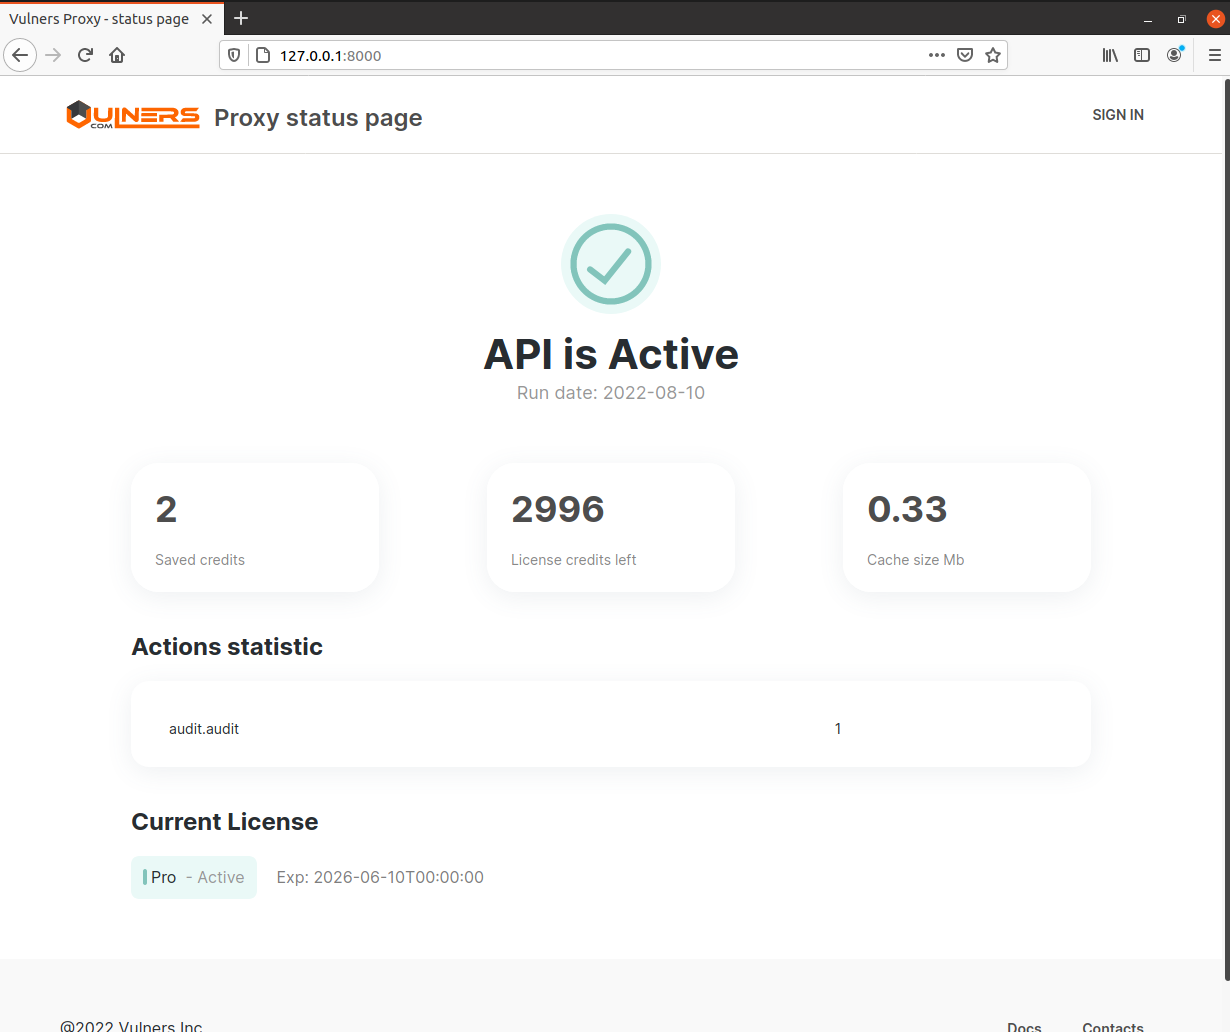
Proxy UI
Vulners proxy has a simple web GUI. With it, you can monitor the proxy status, credits consumption, and some statistics. To log in to the GUI, set your API key in the proxy configuration. To generate an API key, log in to Vulners, go to the userinfo space and click on the API KEYS tab. In the "Scope" field, select "scan", and click SAVE. The result should look something like this:
RGB9YPJG7CFAXP35PMDVYFFJPGZ9ZIRO1VGO9K9269B0K86K6XQQQR32O6007NUK
To see GUI, open proxy host in browser:
Running as a Docker Container
Vulners Proxy is also available as a Docker image, simplifying deployment. The image can be run directly or with customized port forwarding and API key configuration for UI access:
docker run -p 80:8000 -e apiKey=YOUR_SECRET vulners/proxy
For custom configurations, mount a local config file into the container:
docker run --rm -p 8000:8000 -v /path/to/local/config.conf:/etc/vulners_proxy/vulners_proxy.conf vulners/proxy:latest