Qualys Performance Tuning Series: Qualys Cloud Agent Configuration Best Practice
The following blog is part of our Qualys Performance Tuning Series. The first blog covered the topic of optimizing performance through the removal of stale assets. This series aims to provide you with comprehensive guidance on how to enhance the efficiency and effectiveness of your Qualys subscription, particularly when it comes to process automation. This blog shares best practices concerning Cloud Agent Configuration Profiles andActivation Keys
Read the Qualys Performance Tuning Series: Remove Stale Assets for Best Performance
The Qualys Cloud Agent is the cornerstone of the Qualys Cloud Platform. The Qualys Cloud Platform has been meticulously crafted to ensure seamless collaboration between Cloud Agent and platform, resulting in exceptional precision and reliability, swift end-to-end processing, and minimal resource utilization. Cloud Agent is skilfully engineered to capture vital operating system metadata, installed applications, and system configurations, precisely tailored to the requirements of activated service modules across your entire infrastructure. Subsequently, this metadata is uploaded to the platform for comprehensive analysis, correlation, reporting, and alerting. Notably, the agent efficiently transmits only the differentials, minimizing network usage to an extraordinary extent and consolidating it in the Qualys Cloud Platform. Our Cloud Agents provide real-time, global visibility and the ability to execute commands and patch jobs for response.
To ensure that the agent works efficiently and as configured, the following best practices for Configuration Profiles & Activation Keys settings are recommended for all users to follow.
Configuration Profile Creation
Agent configuration profiles define how the Cloud Agent behaves on the asset and has 30+ configurable parameters such as CPU usage, check-in interval, agent upgrade, scan frequency, EDR and FIM behavior, and a set of include/exclude tags that define which assets have the configuration profile assigned, and more. The cloud platform creates an "Initial Profile" by default, which is standard for all customers and cannot be customized.
We recommend creating a Configuration Profile with the following settings as the default profile to ensure optimal data collection. A similar set of settings should be used in any other option profile unless there is a specific reason not to. As many large enterprises use just one or a select few configuration profiles throughout their entire estate, we advise limiting the number of configuration profiles.
Step 1: General Info

When the "In-Memory SQLite Databases" setting is enabled, the cloud agent (Windows) will consume slightly more memory while reducing disk I/O. If RAM has a particular constraint, we recommend not enabling the setting.
When enabled, the "Suspend data collection for VM, PC, SCA, and Inventory for all agents using this profile" setting will stop agents from scanning their hosts, so it is recommended to leave it disabled unless instructed otherwise by Qualys.
Moreover, Qualys recommends leaving the "Prevent Auto Updating of the Agent Binaries" setting unchecked, allowing agents to auto-upgrade once an updated version is available. This ensures that any bug fix or improvement to the agent is automatically rolled out.
Step 2: Blackout Windows
Blackout Windows should be considered risk exceptions. It is necessary when there is an external constraint, such as during trading periods or peak network traffic. Qualys recommends periodic reviews to determine if the Blackout Window is still required or can be removed. If you are unsure, increase scan intervals instead of configuring blackout windows.
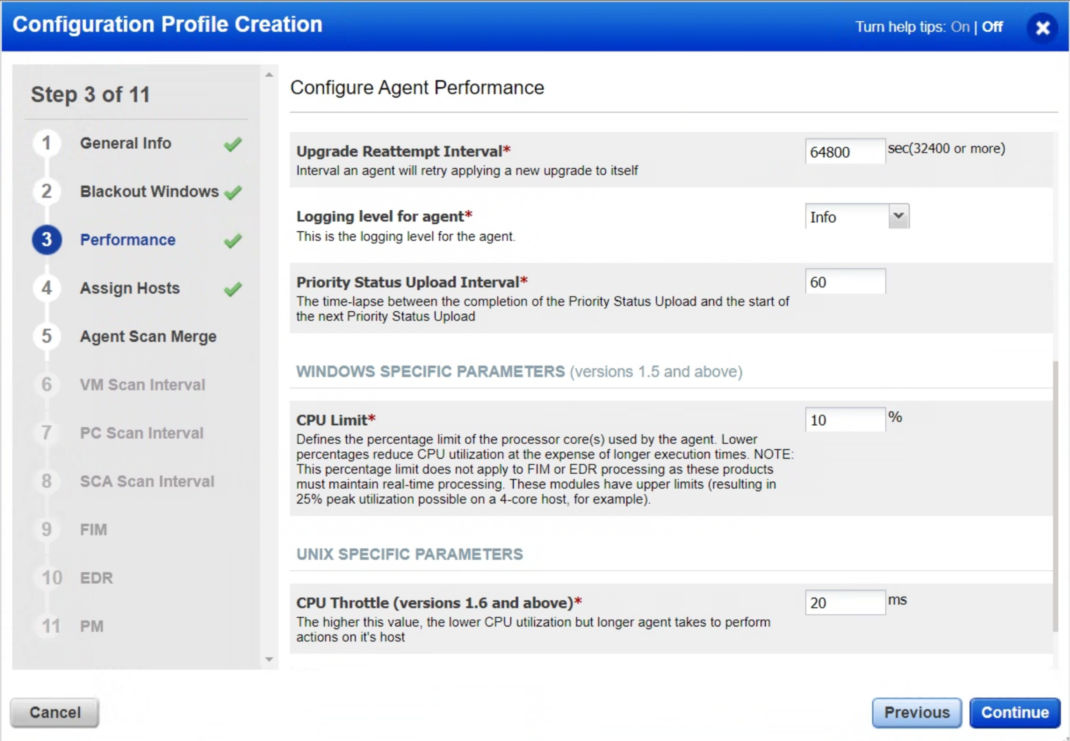
Step 3: Performance Settings
Next, let's discuss Performance Settings. These settings must be followed to scan and process data on time. For this reason, the following settings are recommended, and all other settings can be left as default.

- Agent Status Interval – Set this to 900 seconds so the agent can check with the platform every 15 minutes for updates. As each check-in is less than 1KB, there is no impact on the agent or network.
- Delta Upload Interval – Unless the host's network is severely constrained, set this between 10 and 20 seconds.
- Chunk Size for File Fragment Uploads – Unless the host’s network is severely constrained, set this to at least 2048 KB.
- Upgrade Reattempt Interval – Set a timeout of 64,800 seconds so that if the agent binary upgrade fails, it will try again in 18 hours.
- CPU Limit – As a minimum, keep this at 10% or above. Setting this below 10% will exponentially increase scan times and affect scan data timeliness.
- CPU Throttle – As a minimum, keep this at 20ms or below. Setting this above 20ms will exponentially increase scan times.

Step 5: Agent Scan Merge
It is recommended to enable the "Agent Scan Merge" setting if you are scanning assets using both the network scanner and the Qualys Cloud Agent, as this would reduce duplicates in your environment. We discourage the "Bind All" setting, however, if the Qualys team has asked for it to meet your specific requirement, you can use it.
To learn more about how the settings work and how to configure them, see: Unified Vulnerability View of Unauthenticated and Agent Scans
Step 6: VM Scan Interval
Scan Interval is another setting that every user should ensure. There are three different scan intervals: one for Vulnerability Management, one for Policy Compliance, and one for Secure Configuration Assessment.
Keeping the "Data Collection Interval" at 240 minutes will ensure that any newly identified or fixed vulnerabilities are quickly reflected in the Qualys Cloud Platform.

Step 7 & 8: PC Scan Interval & SCA Scan Interval
We recommend setting the Data Collection Interval to 2160 minutes or higher. It is usually set between 4320 minutes (3 days) and 10080 minutes (7 days) since this reduces the number of scans on the asset. Additionally, it reduces network traffic.
Longer data collection intervals are not of concern, as compliance data changes less frequently. But if you need to collect data from an asset or group of assets frequently, you can use the "On-Demand Scan" feature. To learn more, see On-demand Scan.


The agent will automatically start a scan when a new manifest is available and has downloaded the new manifest, regardless of the scan interval or the time remaining until the next scheduled data collection scan.
The “Scan Delay” and “Scan Randomize” are more advanced settings, so leaving them at 0 is recommended. If the settings are not marked 0, delta uploads can be staggered so that they do not occur simultaneously. VDI virtual machines sharing the same infrastructure can avoid network and disk I/O bursts. This makes it possible to avoid multiple agent hosts uploading simultaneously when they come out of a blackout window.
Step 9: FIM
Ensure the “Enable FIM module for this profile” setting in the FIM tab is enabled and the “Payload Threshold Time” is set to 300 seconds (5 minutes). Reducing it will help you upload data more quickly.
Step 10: EDR
Ensure the “Enable EDR module for this profile”_ _setting in the EDRtab is enabled and the “Payload Threshold Time” is set to 300 seconds (5 minutes). Reducing it will help you upload data more quickly.
Note: Qualys EDR is incompatible with other security EDR software. Any existing EDR software must be uninstalled before installing the Qualys EDR agent.
To install Malware Protection on your asset, ensure Malware Protection is enabled in the profile. While Qualys offers its own Malware Protection, uninstall all other antimalware software if you are using Qualys EDR's malware protection capabilities. Qualys EDR can still co-exist without malware protection with other antimalware programs from third parties.
For more information, see Endpoint Detection and Response Onboarding Guide.

Step 11: PM
Ensure the "Enable PM module for this profile" setting in the PM tab is enabled and the Cache Size is set to 4096 MB. By increasing this value, patches can be cached up to 4GB instead of 2GB if a patch job is done using "Opportunistic Patch Download."

Activation Keys
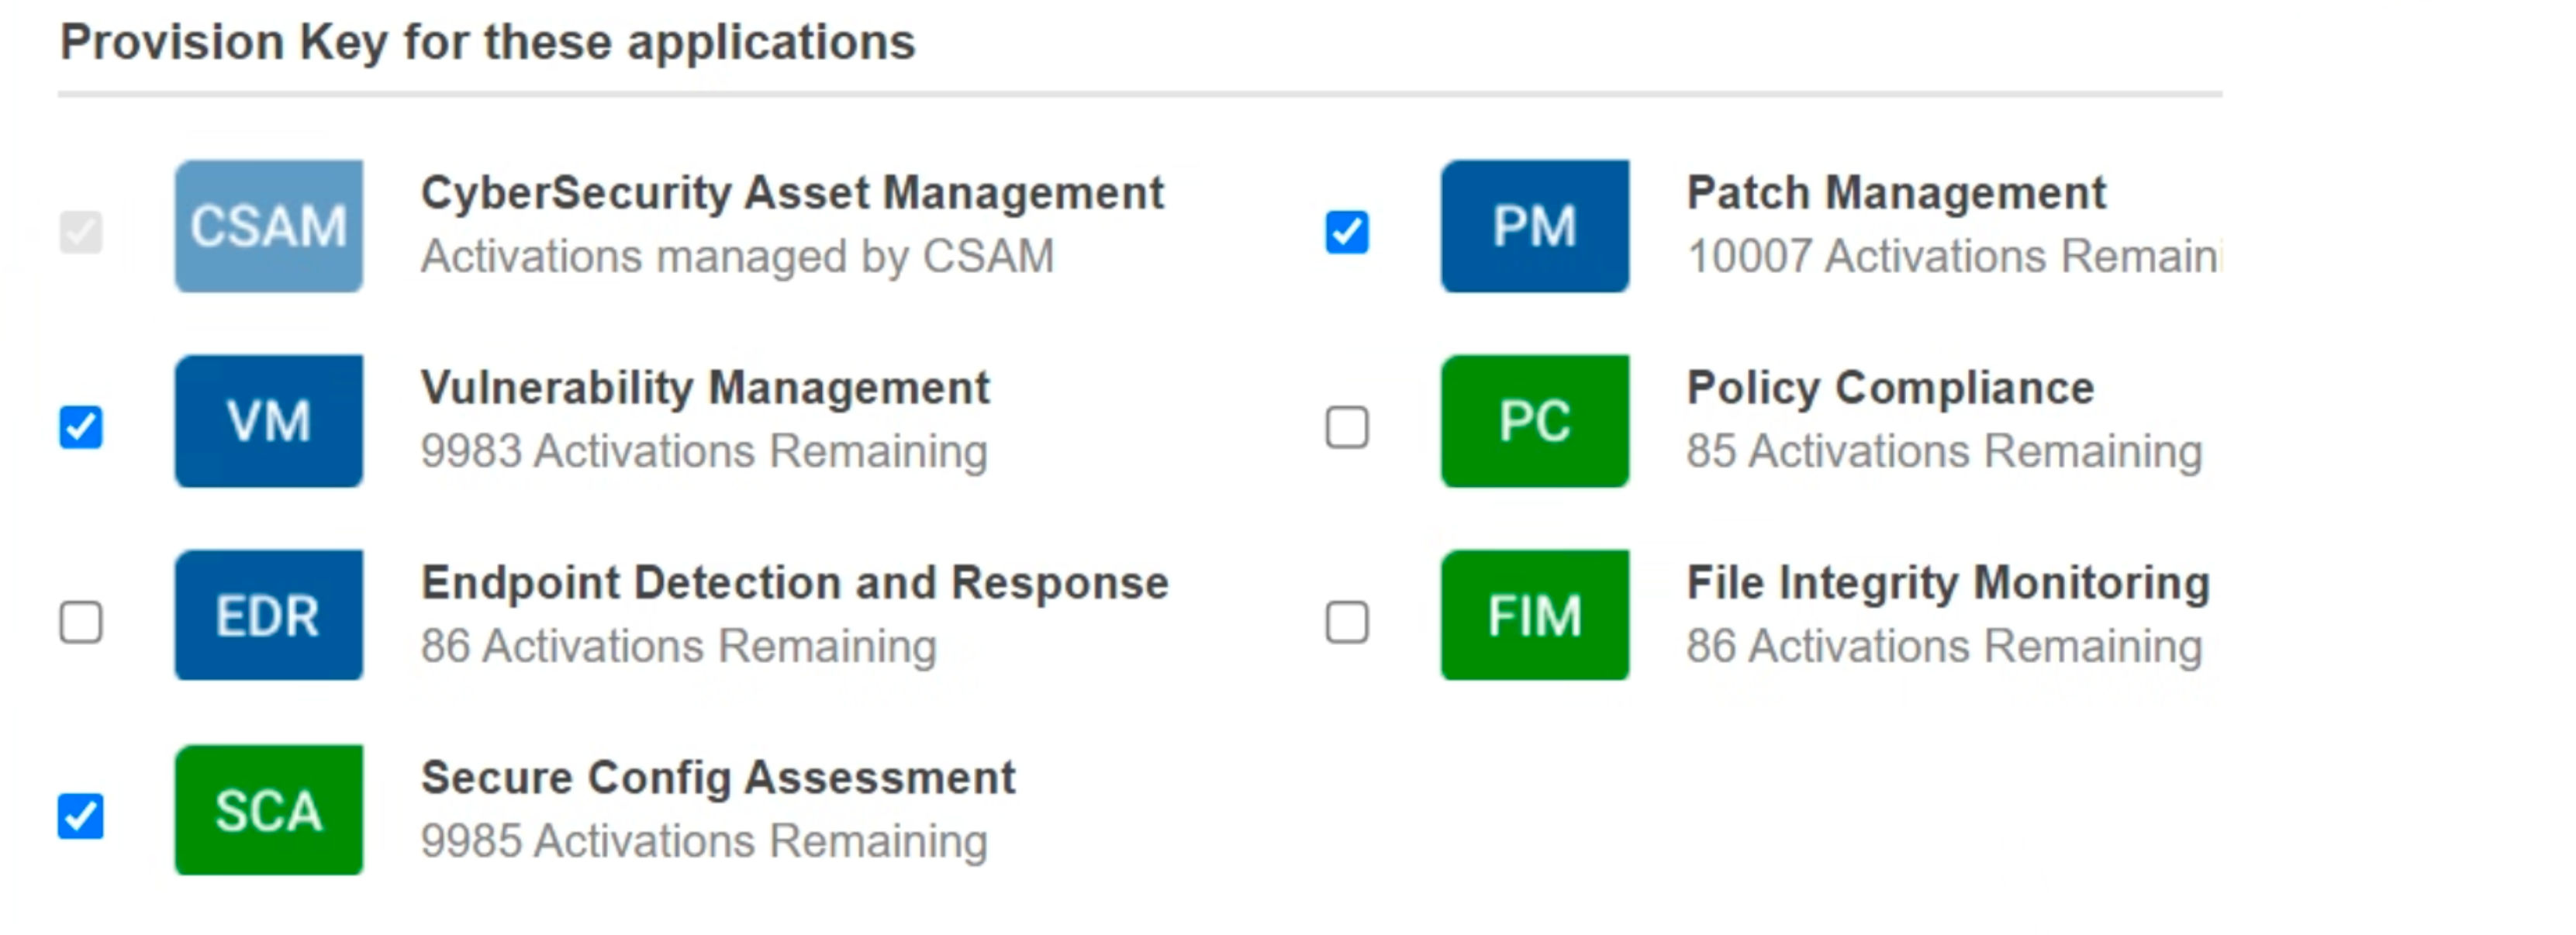
Activation keys are generated within the Qualys platform (via GUI or API) and provided to individual agents during their initial installation process, facilitated through automation, build packages, scripts, or recipes. These keys, along with your customer ID, are utilized by the agent to register with the Qualys platform. Both the keys and the customer ID are in the format of GUIDs. When creating activation keys, you generate the key itself and specify which modules should be enabled for agents activated using that particular key (such as VM, PC, EDR, FIM, etc.). Optionally, you can also assign tags that will be applied to all assets activated using the key.
The creation of activation keys is an initial and vital step in deploying the Qualys Cloud Agent. Without at least one activation key, agents cannot be activated.
In the following scenarios, limited activation keys are recommended:
- Certain modules require distinct activation keys, like File Integrity Monitoring and Endpoint Detection & Response (EDR).
- An enterprise with multiple operating companies using a single subscription is usually advised to give each operating company its activation key. It facilitates role-based access and asset separation.
- It is recommended to create a separate activation key to create a purge rule for assets with a different purging frequency.
- VMDR (Vulnerability Management, Detection and Response) users should enable all VMDR modules by default on their activation keys. To understand which modules must be enabled, refer to the image below.

This blog on Qualys Cloud Agent Configuration Best Practices forms an integral part of our Best Performance Series. Using this series, we aim to maximize the efficiency and effectiveness of your Qualys subscription while incorporating process automation. We encourage you to schedule a meeting with our Solutions Architects or Product Managers should you have any questions or need additional assistance.